The feeds are the most important settings of the app. Good advertising starts with good product feeds, so pay more time on your feeds settings and it will pay off.
Where to get more help
You can get more in-context help by clicking on these “Guide me” buttons on different screens
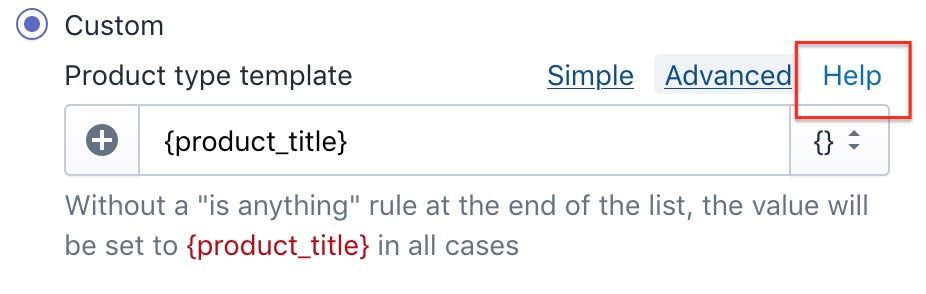
and “Help” buttons on the different inputs
Then our knowledgeable goat will appear and guide you through the relevant form or input. You can click (or touch on mobile) anywhere on the dark screen to go to the next guide or click Skip to end the help mode.

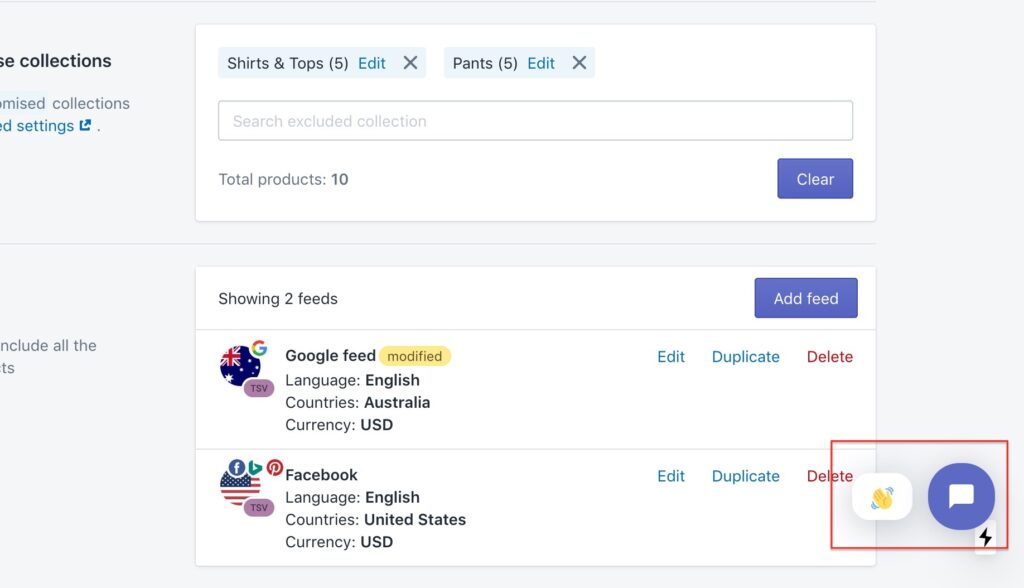
And of course you can always meet us by clicking on the Chat icon at the bottom of the screen. Don’t hesitate because we love to talk!
General concepts
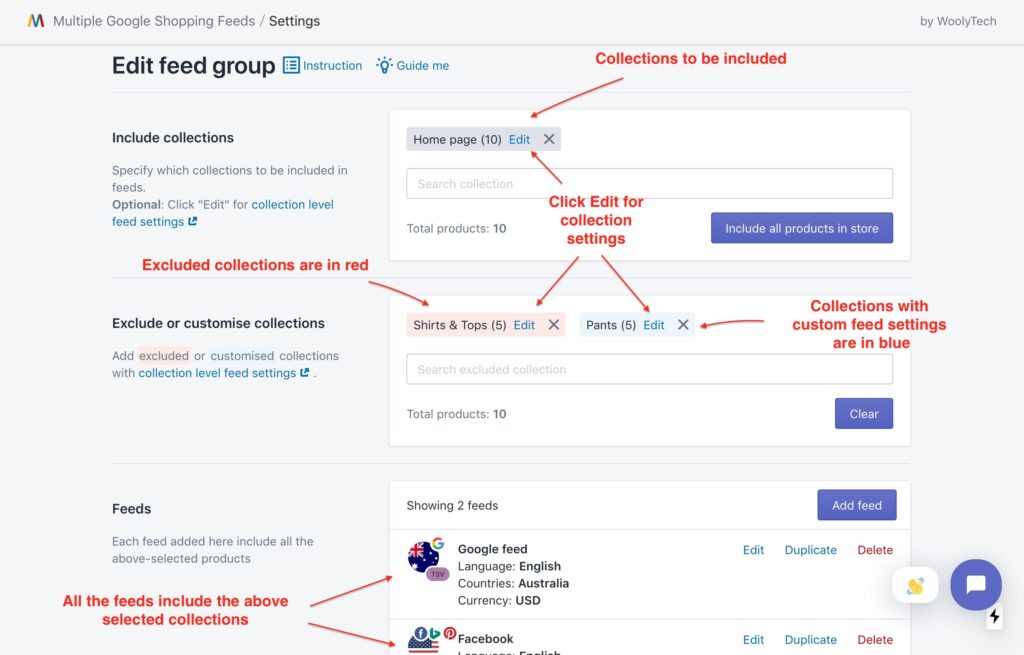
Feeds are included in feed groups. In each feed group you define 3 things:
- Which collections to be included. You can include just part of your portfolio in feeds by collections. You can optionally edit collection level feed settings for each of the collections included.
- Which collections to be excluded/customized with collection feed settings.
- The feeds in the group will then feed the products to Google Merchant Center.
So you need to keep in mind which products that have been included in the group to specify the right feed settings (e.g. Google product category, gender, age group, …).
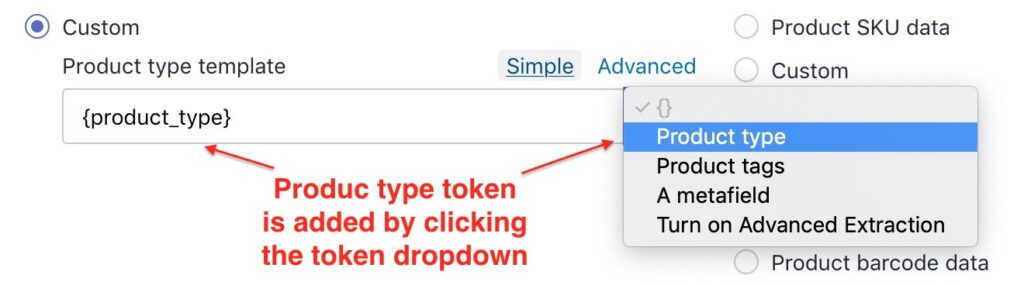
{token} are use though out the feed editor page. You can think of tokens as the place holders for the real data which will be pulled in from the right context (shop, product, variant). Please make sure you read about token in the FAQs before continue with the feed settings. Tokens have “friendly names” in the menu buttons (e.g. “Product title” instead of “{product_title}”), but inside the text input, they appear in their raw form with brackets (“{product_title}”).
Products refer to the products inside your Shopify store. They can include 1 or multiple variants. Please differentiate them from items, which are reflects of your product data inside Google Merchant account generated by the product feeds.
Generally an item is generated from a variant in your store, but a variant can generate multiple items if it is included in more than a product feed. By using variant filters, you can choose to feed only the first variant, a specific variant or all variants of a product. In it’s turn, a single variant will then create 1 or several items (e.g. when included in multiple feeds) in Google Merchant Center.
Besides, your merchant account can include items which were generated from feeds in the past, or even product feeds created by other apps. If you want your merchant account to include only the items from the app, clean it up first by deleting the feeds/products inside Google Merchant Center.
The app will skip the products which are not published or does not have an image (both are required by Google to avoid disapproval).
This explain why the number of products made available to feed and the number of items reported on the Dashboard of the app are generally not the same.
Effective feed settings
It is very important to understand that the effective feed settings actually is a combination of settings at four levels which are listed from higher to lower: account, collection, feed and product levels.
Account level include GMC account shipping and tax settings which you can either import from shop settings or manage manually.
Collection level include basic feed settings (google product category, age group, gender, custom labels, promotion id and included destinations) which will be used if no corresponding data can be derived at the lower levels (feed and product levels). Collection level feed settings can be add/edit for each of the include collections as well as customized collections in feed group settings, and is effective for all the feeds within that feed group.
Feed level include settings you input via the feed editor page.
Product level settings can be accessed from the Products tab in Multiple Google Shopping feeds app. **Maintaining product level feed settings could be cumbersome, so it should only be used as the last resort when the rule-base setting is not enough.
The effective feed settings will be a combination of settings at the 4 levels, in which setting at the lower levels will override settings at the higher levels.
For example, if a feed that have shipping settings configured, it will override (or at least combined with) the shipping settings at the account level. Similarly, if a special product have the material set at the product level, that information will be used for that product in all the feeds that it is included, regardless of what value the material is set to at the feed level.
The feed editor
The feed editor page sections resemble the way Google organization the product data specifications. It is divided into multiple tabs to be managed more easily
- Feed preview
- Simple and advanced input modes
- Rule based settings
- Metadata
- Target
- Basic product data
- Product category and Product identifiers
- Detailed product description
- Shopping campaigns and other configurations
- Shipping
- Tax
- Summary
Feed preview
The feed preview is an effective tool which you can use to test the feed before actually sending it to Google. It can save you a lot of time (and trouble) by resolving feed problems before actually feed it to the platform.
The first time you start the feed preview, you need to select a product. The app will then show the feed data built for the selected product. You can switch a selected product by clicking the “Switch product” button at the bottom of the preview modal.
Please note that if the selected item have feed settings configured at the product level, it will be reflected in the preview too, which might be different from the settings at the feed level.
If the feed preview show an empty page, that could be one of the following reasons:
- The product is not published or does not have an image that can be used for product feed.
- The product is explicitly excluded from product feeds. You can exclude a product at the product detailed page or at the feed status report by selecting multiple products. Products can be excluded in bulk from within the Shopify product listing page by selecting the products > More actions > Multiple Google Shopping feeds.
- The variant filters are in effect. Only variants that passed through the filters are use to generate feed items.
- The action for out of stock variants is in effect. For example if you have selected to exclude the out of stock variants, and all of the variants of the selected product are out of stock, none will be shown
Use the feed preview extensively, as it will help you avoid lots of future problems with Google feed disapproval.
Simple and advanced input modes
Most of the fields on the feed editor page have 2 input modes, Simple (the default) and Advanced. To toggle between the input modes, click on the button at the top right corner of the field.
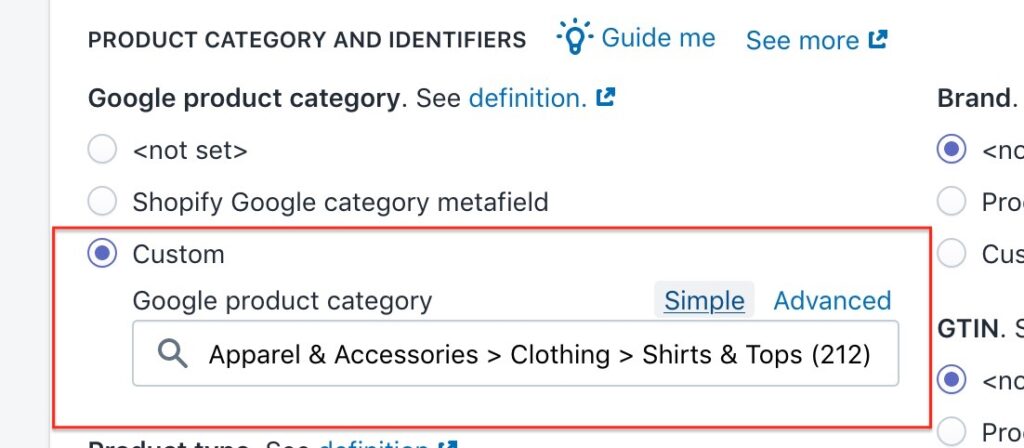
In the Simple input mode, a single expression is entered into the field. Although the expressions can include tokens which pull in the product data and even allow regular expression search/replace, not much logic can be specified for feed data building. In the screenshot, all the products in the feed will share the same Google product category setting, which is “Apparel & Accessories > Clothing > Shirts & Tops”.
In Advanced input mode, you can use rule-based feed settings to derive the final feed data from the product data depending on different criteria.
Rule based settings
Rule based settings are supported in most of the feed data fields by turning on the Advanced input mode at the relevant field.
For example a rule-based setting for the Google product category field can set the category to “Apparel & Accessories > Clothing > Shirts & Tops” if the product title include the word “shirt”, set it to “Apparel & Accessories > Clothing > Pants” if it include the word “pants” and set it to “Apparel & Accessories > Clothing” for all other cases can be setup like in the screenshot below.
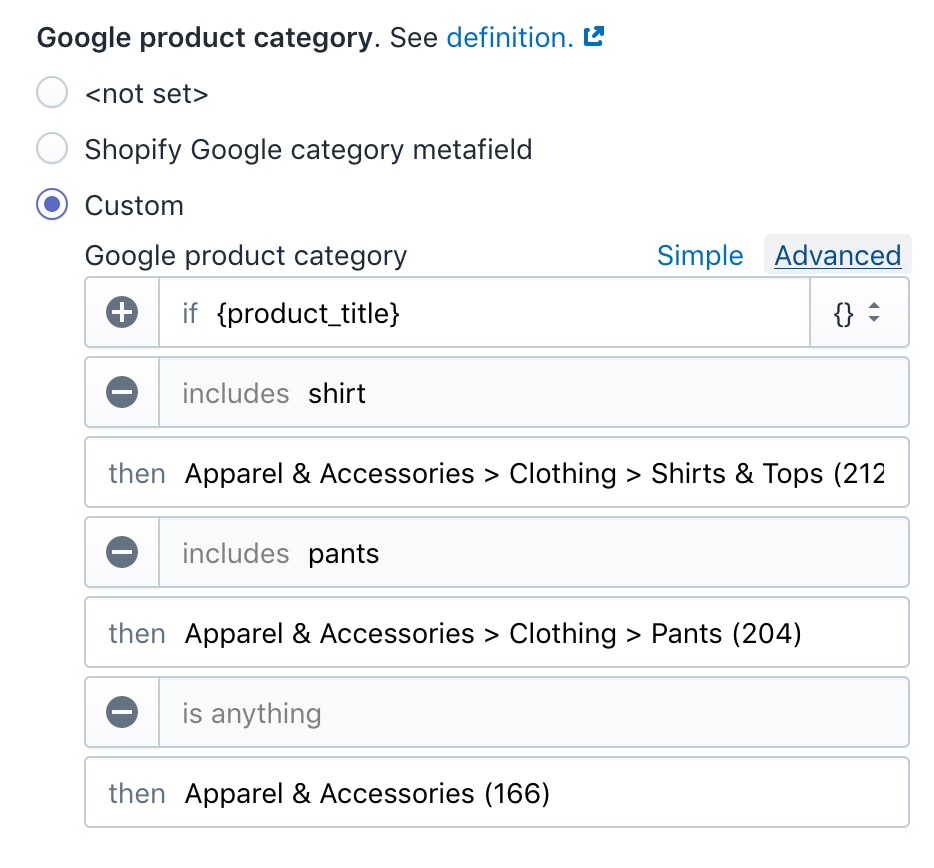
In rule-based setting, the criteria are tested on the base expression from top to bottom and if a match is found, the corresponding outcome (the expression in the then clause) will be used to set the feed data (in this case the Google product category).
In the example above, Google product category is set to “Shirts & Tops” if the product title includes the word “shirt”, if not then set to category “Pants” if the title includes “pants”, or if none are matched, set to “Apparel & Accessories”.
The base expression makes use of tokens to pull in the context data, and can even be a combination of them. In the screenshot, we use the Product title as the base expression, but it could be product description or any token listed in the drop-down at the end of the field.
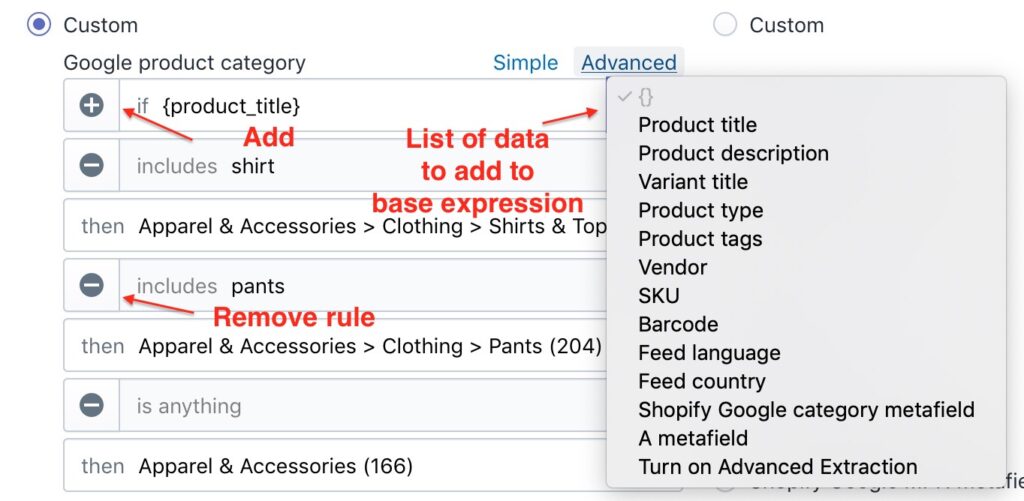
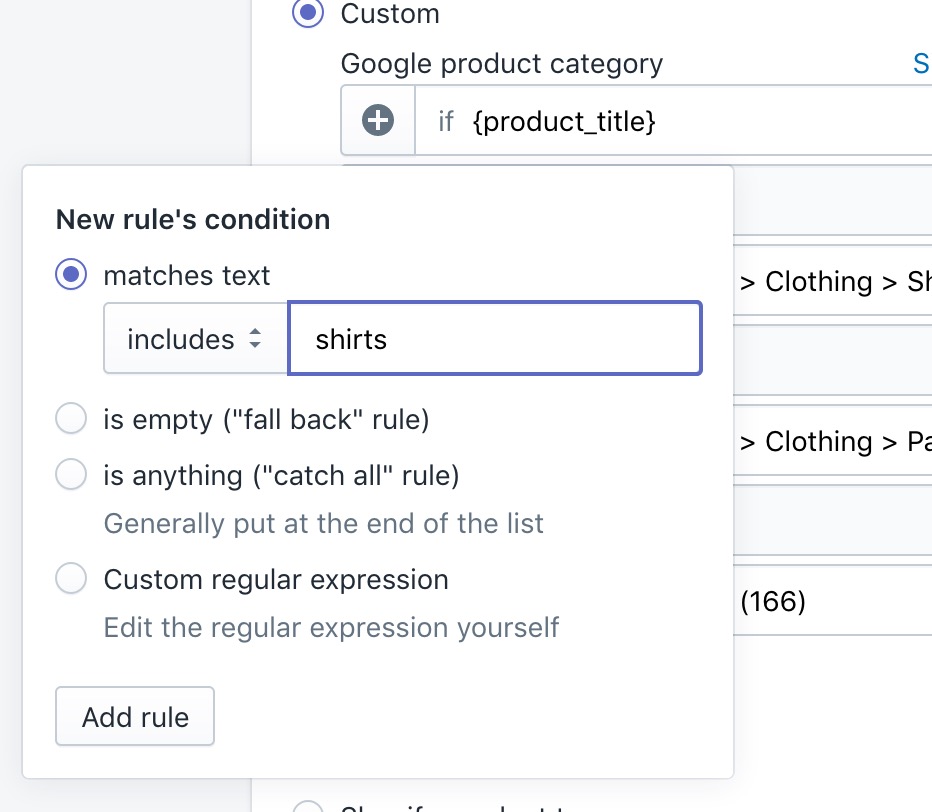
Criteria can be removed by the button with the Minus icon (-) on the left and can be added by the Add criteria button with the Plus (+) icon on the top of the list (to the left of the base expression)
Criteria are regular expressions to test against the base expression. Editing regular expressions is difficult so we include a small “wizard” form when the Add criteria button is clicked for the most use cases.
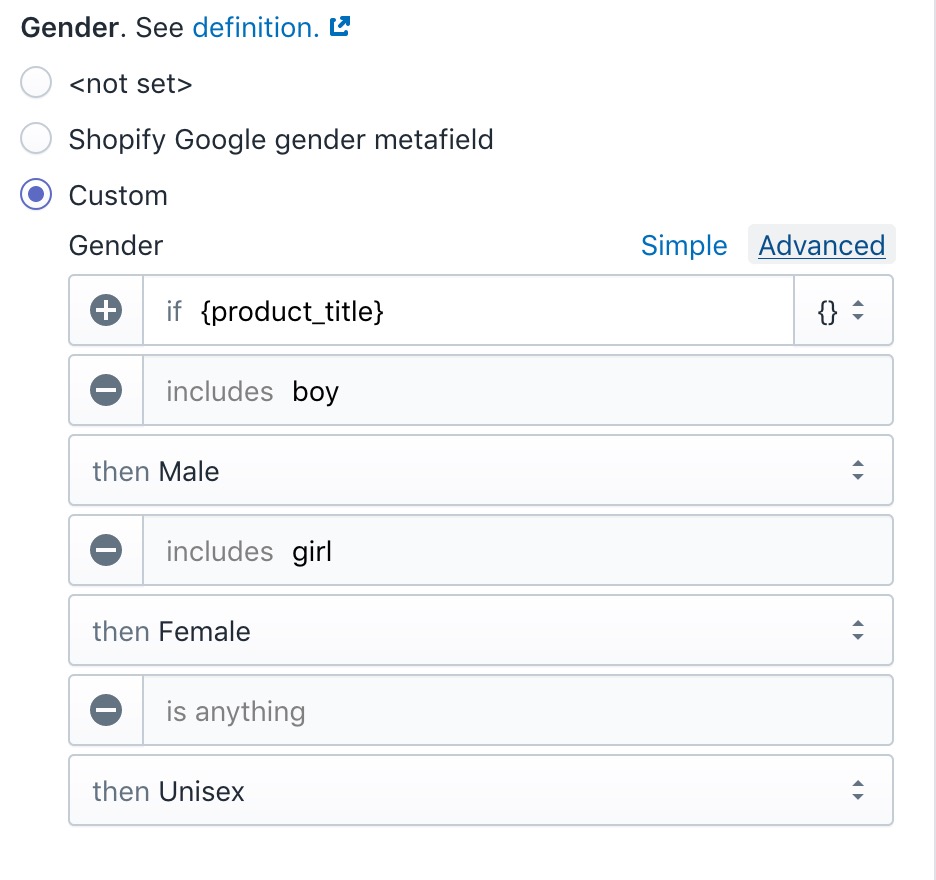
Rule based settings are supported in most of the feed data fields, allowing flexible feed data for your diversified product portfolio. Below is another example of using rule-based settings for the Gender field
Metadata
The feed metadata tab contains the settings that define the feed. It includes
- Feed name: For your own reference across the app.
- Include multiple variants:
- If not selected, only the first variant that meet the requirements is included. The use case for this is when you have large store, and you want to keep within the Google Merchant limits (default to 150k items).
- If selected, all the variants that meet the requirements (defined by other settings) are included in the feed and grouped under same item group id. This help enrich your product feed, which will enhance your ads which can lead to better sales.
- Action for out of stock variants
- Leave it in as out of stock: include the variant and set it as out of stock.
- Leave it in as in stock: include the variant and set it as in stock.
- Include only them: This create a feed with only out of stock variants, which can be used as a supplemental feed to inform Google Shopping of the items that have gone out of stock.
- Exclude them: Do not include out of stock variants in feed
- Variants filter by options: select variants for feed by their options. For example you can pick only a v-neck variant of your tee, if you want to specifically target women in your product feed. You can also feed only the L/XL sizes of a shirt because M down and 2XL up sizes are generally not as common.
- Ads platform: Select the targeted platform that the feed is used for. Depending on the selected platform, the available feed formats is shown.
- Feed format:
- API: using Application Programing Interfaces to send feed to the ads platform. For Google Shopping it is Content API. This generally means faster synchronization. **Please note that this option for Google Shopping does not remove the items from Merchant Center one the corresponding product is removed/excluded from feeds. If that is desired please switch to use one of the file feed options
- XML, TSV, CSV: feed file options. Feeds will be generated as file in the selected format, with an URL which can be used to create feed in the ads platform.
Target
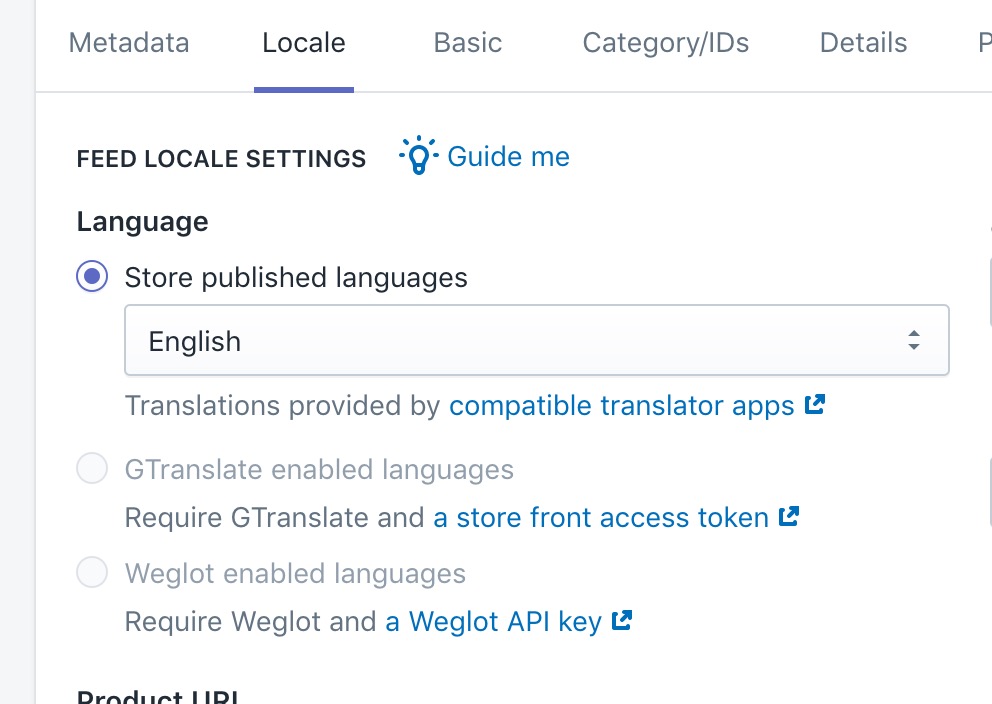
Here you specify the target language, country and currency. If the shop is multilingual/multi-currency, the available language and currency options will be enabled.
Country options is automatically narrowed down to the one that is supported by the selected language, using most updated Google information. If multi-currency is enable, the best-matching currency for the selected country is automatically selected too.
- Language: This set the language used to create feed data. If you are using Shopify multi-language compatible translator apps, you can select one of the published languages to create translated feed. Weglot and GTranslate users can start creating translated feeds by entering some integration data to the app as described in the Integrations section.
- Country: The country of sale. This list is narrowed down to the countries which speak the selected language. Please note that for Google Shopping, feed created for a country can also be used to target others if they are in the same group.
- Currency: This is the currency to be used for the feed product prices. Currently only the currencies that are enabled by multi-currency feature of Shopify Payments are enabled. The reason behind it is that currently only Shopify Payments allow a consistent currency from when customer see in ads, arrive at landing page until checkout – as required by Google Shopping.
- Domain for product URL. If your store support multiple domains, you can select a domain to be used to generate the product URL in the feed. If you choose the “Store default” domain, whenever the default domain is switched, the app will update the feeds to reflect the new domain.
- Auto calculate product URL. Choose this option will let the app create the product link based on the selected language, currency and domain. The app will add the necessary components to the URL to reflect the selected options.
- Manually edit the product URL. Select this if you want to customize the product URL. You can for example add tracking information to the URL, or edit locale parameters if the auto calculate option is not enough.
Basic product data
This section specify how the basic data of the item in GMC is generated, including the ID, product title and product description. You can used the predefined token to provide the product data into the feed ({product_title}, {variant_title}, …). You can add in your own text for better SEO if you need to.
{product_options} is a special token which provide a combination of the product available options into the feed. Put it in the description and you will have a text like “Styles: Short-sleeve, Long-sleeve; Colors: Red, Blue; Sizes: Small, Medium”, which is recommended for some product categories for better SEO.
Product category and identifiers
In this section you find the most important feed setting, the Google product category. Although it is not mandatory to be included, you need to specify it whenever you can, as it affect how Google identify the right interest groups for you. Since it is not mandatory, you can still save the feed without it, but you will see a pop-up asking if you know what you are doing.
Product type is generally use to categorize your products inside Google Merchant Center. For example you might run a campaign on your product type “Shoes” and have another campaign for your “Shirts” product type. Keep in mind what products that have been included in the group when you set this parameter. You can also rely on the {product_type} token to pull in the product type field of the product.
You also specify the values for the identifier fields, GTIN, brand and MPN. Google have specific requirements for the identifiers, and the app will automatically set the right value for identifer_exists flag depending on your identifier availability.
Detailed product descriptions
In this section there are some important product data, including the age group, gender, color and size.
By default, the color and size fields are set to the dynamic tokens of {pa_color} and {pa_size} respectively. But if the color or size data is stored in under a different option name (e.g Colour, Options), you need to change the token names accordingly (e.g. {pa_colour}, {pa_options}).
Some settings are mandatory or optional depending on the category selected. The app will give the right warning if a mandatory settings is missing.
If your product have material or pattern data, remember to include them for better customer ads experience. You can set a fix value, or using a dynamic token to pull in the right option value for the field.
Shopping campaigns and other configurations
If you want to run sale campaigns, in which your ads will be shown with special tags like ‘10% OFF’ or ‘Free shipping’, first you need to apply for such a campaign in Google Merchant Center. Then you can enter the Promotion ID to inform Google that all the products in the feed is falling under the specified campaign. Of course, make sure that they do (e.g. set the right price/compare at price for products, shipping cost at checkout and/or free shipping coupon) or your feed can be disapproved.
Custom labels are used to slice and dice the items inside Google Merchant Center. If you have a large product portfolio with multiple types of products, you will probably need to run different ads campaign for each of them. Think of custom labels as a way to “tag” the products with values that you can use to grab the product (of the same tag) together to put into a campaign. Custom label is useful for multilingual feeds, to tag the data with the right feed language. The right language version of product data then can be selected for different ads target groups.
Shipping
This is where you define shipping settings at the feed level. These attributes can be used together with the account shipping settings to help you provide accurate shipping costs.
If you have a shipping tariff based on product weight, make sure that products’ weight is submitted in product feed by setting the shipping weight and shipping weight unit fields. By default, these fields have value set to {sh_weight} and {sh_weight_unit} tokens, which will pull the weight from product/variant data.
You can also add up to 100 shipping entries, each represent a combination of shipping destination, shipping method and shipping price.
Tax
In this tab you define the tax settings at the feed level. If you want to set different tax rates for specific groups of products, use tax_category to apply a label to products, such as “perishable foods” or “clothing”. If you submit this attribute, it can be used to amend the tax settings you’ve entered into your Merchant Center account for the states for which you have configured tax rates.
For US, you can add up to 100 tax entries to be used together with the account tax settings to help you provide accurate tax costs.
Integrations
We are partnering with a number of apps in Shopify Store. Some of them require additional integration setup
Shopify Storefront access token
The Storefront access token is required to turn on the unit pricing measure support in product feeds. It is also required for GTranslate support.
You can follow these steps to get a Storefront API key and enter it into the Integrations section of the app
1/ Enable private app for your store if you have not done so.
2/ Get a Storefront access token. In step 4, enter “Multiple Google Shopping Feeds” and “[email protected]” as the name of the app and email of the developer. In step 6, select “Read products, variants, and collections”.
Copy the provided Storefront access token from the bottom of the “Store front API” section and paste it into the app Integrations section in Settings page.
GTranslate
In additional to the storefront access token, integration with GTranslate required the following keys to be added into the Translate JSON keys settings in the GTranslate dashboard.
| Key | Type |
| data.nodes.#.title | Text |
| data.nodes.#.description | Text |
| data.nodes.#.descriptionHtml | HTML |
| data.nodes.#.options.#.values | List |
Weglot
Weglot support requires a Weglot API key and use of language subdomains (or a Weglot settings that allow the product URLs can be language-specific. The reason behind this is Google bots and users need to arrive at the right language after following a product page URL, otherwise the products and the feed can be disapproved.
The Weglot API key is available in the Weglot dashboard of the Weglot account.
Advanced Shipping Rules
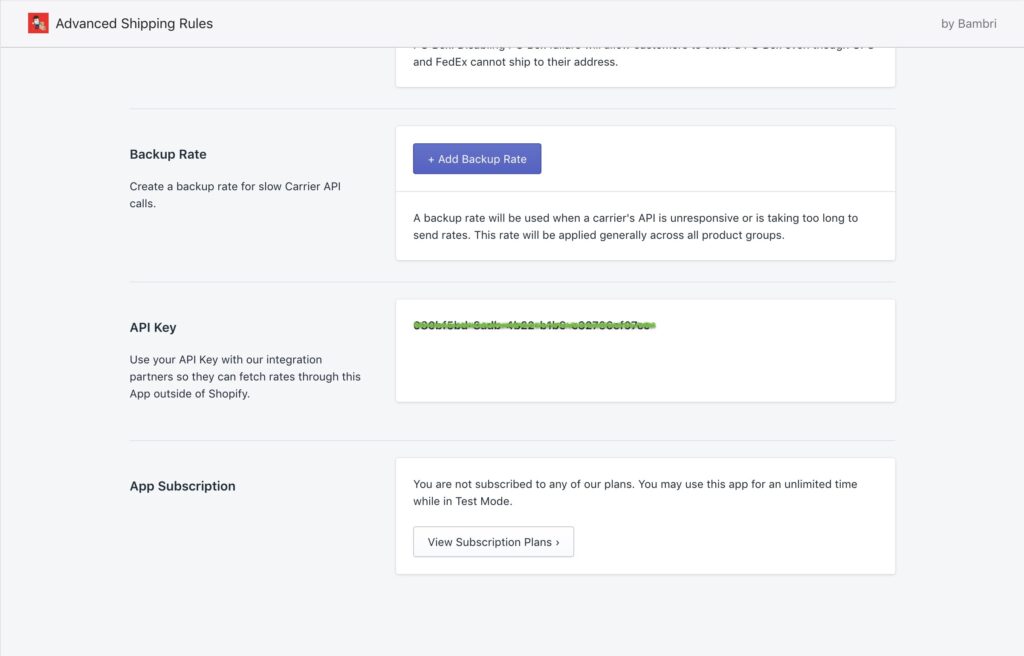
Advanced Shipping Rules users can take advantage of this integration to synchronize sophisticated shipping settings to Google Merchant Centers. All you need to do is to enter the Advanced Shipping Rules API key into the app.
The API key is available in the Settings section of the Advanced Shipping Rules app
Summary
In this section you find the summary information of your product feed. For live feed, there will also be information about the last run of the feed.
For file feeds, the Feed URL is found here. You can copy and paste this URL to the ads platform to create new feed.
There is an important feature which can be accessed from this tab, which is the Feed Preview.